Sunday, November 25, 2012

Static ARP Entery in CISCO Switch


Synatax :
arp <IP> <MAC> arpa
arp x.x.x.x 0000.0000.000 arpa


Example
R1(config)#arp 10.1.1.25 00ac.a1f3.01ab arpa


Notes :
  • static ARP entries are more preferred as they are administratively added.
  • this way you can ensure that even if you have an ip duplicate the important devices in your network will be always accessible .

Thursday, September 27, 2012

2 default gateways

if we have two Network Cards (NIC) and we want to use one of them for internet and the other for our company network :


NIC (A) Connected to the Company Network (192.168.0.0) through router 192.168.1.1

NIC (B) Connected to the Internet    Network ( 172.16.0.0)  through Router 172.16.0.1


Solution :

1-change the "metric " of the NIC (A) connected to internet to "2000"

How:

   Network and share > change adapter setting > Right click on NIC (A) > properties >

      TCP/IP v4 Setting >advanced > "un-chek Automatic metric and write the value 2000 in the text box"

2-create static route for the local networks

     for the company networks we need the PC to go through NIC (B) so we need to create the following static route :

Run > CMD > :

route ADD 192.168.0.0 MASK 255.255.0.0 192.168.1.1


static route in win 7

          Dest Ip       Netmask       Gateway  interface
route ADD 10.0.0.0 MASK 255.255.255.0 10.0.0.1   IF 2

Wednesday, August 15, 2012

STC ADSL modem (EchoLife) as dhcp relay

to enable the adsl modem provide by STC type (EchoLife) to pass dhcp requist to a DHCP server behind the router we have to enable this option :


Wednesday, August 8, 2012

Disable CTRL+ALT+DEL requirement for logon - in Domain


Computer Configuration\Windows Settings\Security Settings\Local Policies\Security Options
Description
Determines whether pressing CTRL+ALT+DEL is required before a user can log on.
If this policy is enabled on a computer, a user is not required to press CTRL+ALT+DEL in order to log on. Not having to press CTRL+ALT+DEL leaves the user susceptible to attacks that attempt to intercept the user's password. Requiring CTRL+ALT+DEL before logon ensures that the user is communicating by means of a trusted path when entering their password.
If this policy is disabled, then any user is required to press CTRL+ALT+DEL before logging on to Windows (unless they are using a smart card for Windows logon).
This policy is disabled by default on workstations and servers that are joined to a domain. It is enabled by default on stand-alone workstations.

How to Setup a VPN Server in Windows Server 2008 R2

Setting up a pptp VPN server in Windows server 2008 is a relatively simple and trivial task. Pptp VPNs are certainly very handy when you need to quickly allow users into your network and, although less secure, pptp vpn servers are a breeze to install and configure compared to ipsec vpn servers. The setup changed a little from 2003 to 2008. Now RRAS needs to be added using server manager as a “role” using the Server Manager. In this tutorial, I will walk you through the installation. Before we begin our project I will advise that if you wish to setup a quick pptp vpn server at home the best way to do this, in my oppinion, is using a home router rather than having a computer always on consuming power. If you want to learn how to do this, read my article: Setup a VPN with DD-WRT.
Instructions
Install all VPN Server Related Services
Open “Server Manager“.


On the top menu, click on “Action” and “Add Roles“.

This will bring up the role installation wizard. On the first screen titled “Before your begin” read the requirements and click “Next” to continue.
Next, on the screen titled “Select Server Roles“, place check mark on “Network Policy and Access Services” and click “Next” to continue.

On the third screen titled “Network Policy and Access Services” read what it is stated and click “Next” to continue.
On the following screen titled “Select Role Services” place a check mark on “Routing and Remote Access Services” and make sure “Remote Access Service” and “Routing” are selected as well. Click “Next” to continue”.

Next, on the screen titled “Confirm Installation Selection“, you will get a summary of everything that will be installed. Make sure everything looks good and click on the “Install” button. Once the installation finishes, click “Close” to end the wizard.
Back on the main Server Manager window, right click on “Configure and Enable Routing and Remote Access“.

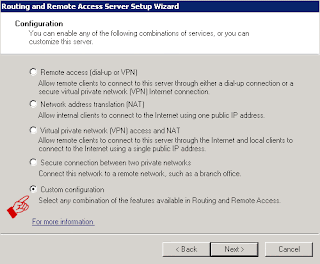
This will bring up the “Routing and Remote Access Wizard“. On the first window, click “Next“.
On the second window, select “Custom Configuration” and click “Next” to continue.

Next, place a check mark on “VPN access” and click “Next” to continue.

On the last screen of the wizard, click “Finish” and then click “Start Service” on the following window that will pop up.
Once the process is finished, and you are back on the main Server Manager window, routing and remote access should now be up and running.


Open Ports on the Firewall
For PPTP open:

Port 1723 TCP
Port 47 GRE

Give Domain Users Access to the VPN
If you are on a domain, go to your domain server, click on “Start“, “All Programs“, “Administrative Tools“, “Active Directory Users and Computers“.
On the left hand side column, look for your domain users. Double click on the user you want to give access to. This will bring up the properties for that user. Click on the “Dial-In” tab and under “Network Access Permission” select “Allow Access“. Click “Apply” and “Ok” to finish.


Repeat the same operation for all users on your network you want to give VPN access to. And that is it, as simple as that!

ISCASI configuration for NAS

What is iSCSI and how can one benefits from it?
Microsoft Active DirectoryiSCSI, (Internet Small Computer System Interface), an Internet Protocol (IP)-based storage networking standard for linking data storage facilities. By carrying SCSI commands over IP networks, iSCSI is used to facilitate data transfers over intranets and to manage storage over long distances. iSCSI can be used to transmit data over local area networks (LANs), wide area networks (WANs), or the Internet and can enable location-independent data storage and retrieval. (quoted from Wikipedia)
An all-in-one storage solution with high ability of expansion and low establishment cost is alway seeked by most SMB storage infrastructure planners who have budget concerns and overall ease of delpoyment. With the iSCSI service on QNAP Turbo NAS it can instantly be served as your storage expansion or backup destination of the application servers, such as database server, mail server, or Time Machine (for Mac OS X 10.5 or later) in the business environment. This article demonstrates how you can use the iSCSI target service on QNAP NAS for storage expansion on different operating systems. See below for the usage scenario.
iSCSI target usage scenario
Things to know before we start
In between the relationship of your computer and the storage device, your computer is called an 'initiator' because it initiates the connection to the device, which is called a 'target'.
Note: It is NOT suggested to connect to the same iSCSI target with two different clients (iSCSI Initiators) at the same time, because this may lead to data crash or disk damage.
To begin, simply follow through the step-by-step guide below.
Create an iSCSI target volume
Log in to your QNAP NAS, go to 'Disk Management' > 'iSCSI' > 'iSCSI TARGET LIST' > 'Create New iSCSI Target' to create a new iSCSI target.
Refer to the image below to enter the required information to create the iSCSI target.
*Allocating the disk space ensures that an iSCSI Target has enough disk space as specified. However, the disk will take longer to create (depends on the given size) and there must be enough space on the physical disk.
Upon the successfull creation the iSCSI target will be shown on the iSCSI Target page and with status showing 'Ready'.
Advantages of Thin Provisioning on QNAP NAS
With thin provisioning, the system administrator can flexibly allocate the disk space (on iSCSI Target) to the server applications to expand the storage capacity anytime regardless of their current storage size. The adding of the storage space on the servers can be easily done on different operation systems by the iSCSI initiator. Thin provisioning allows efficient storage management since the system administrator has to monitor only the storage capacity of one single server (QNAP NAS) rather than extra hard drives or tapes on other sub-storage systems. Over-allocation is allowed since the storage capacity of the NAS can be expanded by Online RAID Capacity Expansion
To connect to the iSCSI target we've just created select the tab representing the operating system you use to proceed.
Connect to the iSCSI targets by Microsoft iSCSI initiator on Windows
This article shows you how to use the iSCSI initiator on Windows to add the iSCSI target (QNAP NAS) as an extra partition. Before you start to use the iSCSI target service, make sure you have created an iSCSI target on the NAS in ‘Device Configuration' > ‘iSCSI Target' and installed the correct iSCSI initiator for your OS.
iSCSI Initiator on Windows
The Microsoft iSCSI Software Initiator v2.07 is an official application for Windows OS 2003, XP, and 2000 to allow users to implement an external iSCSI storage array over the network. If you are using Windows Vista or Windows Server 2008, the Microsoft iSCSI Software Initiator is included. For more information and the download location, please visit:
http://www.microsoft.com/downloads/details.aspx?familyid=12cb3c1a-15d6-4585-b385-befd1319f825&displaylang=en
Start iSCSI initiator from 'Control Panel' > 'Administrative Tools'. Under the 'Discovery' tab click on 'Add Portal'. Enter the NAS IP and the port number for the iSCSI service.
The available iSCSI targets and their status will then be shown under the 'Targets' tab. Select the target you wish to connect then click on 'Log on'.
You may click on 'Advanced' to specify the logon information if you have configured the authentication otherwise simply click on 'OK' to continue.
Upon successful logon, the status of the target now shows "Connected".
After the target has been connected Windows will detect its presense and treat it as if there was a new hard drive has been added which needs to be initialized and formated before we can use it. Right-click on 'My Computer' > 'Manage' to open the 'Computer Management' window then go to "Disk Management" and a window should pop-up automatically asking whether you wanna initialize the newly found hard drive. Click on OK then format this drive as normally you would when adding a new disk.
That's it! After disk initialization & formatting, the new drive is attached to your PC. You can now use this iSCSI target as a regular disk partition.